foodie 1


Showing posts with label main dish. Show all posts

Monday, July 16, 2012

Chicken Gnocchi Soup: Secret Recipe Club

For this month's Secret Recipe Club I was paired with Jen of Jen's Journey.  I had many great recipes to chose from on her blog.  She also has lots of great reviews on her blog, I even found a few new books to read while I was there!  This recipe caught my eye because we were expecting 'cooler' weather here in the DC area.  And, by cooler I mean highs were going from the low 100s to the low 80s.  Not exactly typical soup weather, but it worked!

It was delicious -- I made a few changes but nothing drastic.   The tender gnocchi paired well with the sweetness of the carrot.  We did just throw the frozen gnocchi into the soup to cook, so we had to add quite a bit more liquid, I used chicken stock.  We used a leftover grilled chicken breast for the shredded chicken and it added a nice, smoky flavor.  We thought it was tasty and will definitely make it again when it really does get 'cooler' this fall.


Chicken Gnocchi Soup
adapted from Jen's Journey
serves 6

Ingredients:
3 tablespoons butter
1 tablespoon olive oil
1 cup onion, finely diced
2 minced garlic cloves
4 tablespoons flour
6 cups chicken broth
1 cup carrots, finely shredded
1 large chicken breast, cooked and shredded
1 pound potato gnocchi
1 bag fresh baby spinach
2 cups half and half
1/2 teaspoon dried thyme
1/2 teaspoon dried oregano
Freshly grated Parmesan cheeses(optional)

Directions:
  • Heat a large pot over medium heat.  Melt the butter and add in the olive oil.  When melted, add the onion and garlic and saute until translucent and softened, about 5 minutes.
  • Add the flour and stir to make a roux.  Cook mixture for 1-2 minutes, until begins to turn a very light brown.  
  • Whisk in 4 cups of the chicken broth and turn to medium-high.  Let the mixture simmer until it begins to thicken.  
  • Add the shredded carrots, shredded chicken, gnocchi and remaining 2 cups of chicken broth to the pot.  Stir well and allow the soup to simmer again.  Once returned to a simmer, add in the spinach and stir to wilt.  
  • Add the half and half, thyme and oregano to the soup and stir well.  Bring back to a simmer then serve.  Top with grated parmesan if desired.  

Monday, June 11, 2012

Creamy Chicken Taquitos: Secret Recipe Club

I was so excited to get my assignment for this month's Secret Recipe Club!  This is a blog I've been following for a few years now so I already had it in my Google Reader with plenty of starred recipes ready to go!  Even though I thought I was pretty sure of what I wanted to make, Rachel at Good Thymes & Good Food had plenty of mouth-watering pictures to make me reconsider my choice several times!  My first thought was her recent Chocolate and Salted Caramel Pudding Pops, which I am sure I will make at some point this summer, but then I found myself gravitating toward dinner dishes to complete our weekly menu.  This Southwest Chicken Meatball Skillet was on my list, and is another recipe I am sure we make make before the summer is over, but I finally chose (with Zach's help) Creamy Chicken Taquitos.


These were all the rage on many food blogs in 2011, but I never made them.  I tend to have an unusual reaction when something is popular and it seems like everyone is saying "You MUST eat/read/do this/watch/listen to/make these RIGHT NOW!"  The more I hear that, the less likely I am to do the activity in question.  But, now that the hype has died down over these taquitos, I read the recipe and decided that I'd give them a try.  Now that no one was insisting that I run out and buy the ingredients to make them this very instant I was much more likely to actually make them.  Call me an opposite hipster; hipsters like things before they are cool, I suppose I like things after they are cool.  Just add Creamy Chicken Taquitos in with The Dark Night, The Hangover, Adele, Bridesmaids, and The Voice.


Anyway, we thought these were really great.  The flavors were delicious and they made a nice dinner with the addition of sides of brown rice and refried beans.  We used one giant chicken breast, seared in a pan with just salt and pepper, but you could definitely use leftover roasted or rotisserie chicken as well.  The only thing I might change would be to add in some of the Hatch chiles we have in our freezer next time.  We used a medium size tortilla, not the small taco ones and not the large ones for burritos or wraps. Our grocery store calls them 'gordita' sized.  Using the smaller, taco-sized tortillas would make for a super appetizer for a party.


Creamy Chicken Taquitos
from Good Thymes & Good Food
Makes 10 medium taquitos or 16 small


Ingredients:
3 ounces cream cheese, softened
1/4 cup green salsa
1 Tablespoon fresh lime juice, about 1 lime

1/2 teaspoon cumin
1/2 teaspoon chili powder
1/4 teaspoon garlic powder
3 Tablespoon chopped cilantro
2 green onions, sliced
2 cups cooked chicken, shredded
1 (15 oz.) can black beans, drained and rinsed
8 ounces shredded cheese (I used a Mexican blend, but you can use any combination you like.)
10 medium flour tortillas
Kosher salt
cooking spray

Directions:
  • Preheat oven to 425 degrees.  
  • Combine cream cheese, salsa, lime juice, cumin, chili powder, garlic powder, cilantro, green onions and chicken in large bowl.
  • Add in black beans and cheese and stir gently until just combined.
  • Portion 3-4 tablespoons of mixture on each tortilla.  You should place it on the bottom third of the tortilla and then wrap up the tortilla, rolling tightly.  Place the rolled tortillas on a baking sheet, seam side down, about an inch from each other.  
  • Spray the tops of the rolled tortillas with cooking spray and sprinkle with kosher salt.  Place in the oven and bake for 15-20 minutes, or until tortillas are browned and crispy.  
 

Friday, April 27, 2012

Pasta Carbonara

This is another recipe (like Wednesday's risotto) that I can't believe I haven't posted to the blog yet.  This is easily my favorite pasta dish to make at home.  It's quick, it's easy, it's made out of common pantry ingredients AND it has bacon in it.  What's not to love?

Pasta Carbonara is always a fallback option for us since we always have bacon in the freezer.  It just takes twenty minutes or so under cold water and it's defrosted and ready to go.  It's definitely a comfort food option for us as well.  The creamy sauce made when the egg is gently warmed and combines with the cheese is so deliciously salty from the parmesan and the smokiness from the bacon, there's no horrible day that this pasta won't improve.  Do make sure you temper the egg and cheese sauce slowly and carefully.  I've done it too fast before and you end up with a sauce made of scrambled egg bits and that's not good.  I've been making it from this base recipe for over five years now, maybe even longer.  I changed up the recipe a bit, always adding in onions and have added in either spinach or mushrooms in the past as well.  I hope that you find that this recipe becomes a staple in your kitchen as well.


Pasta Carbonara
serves 4, adapted from Rachael Ray/The Food Network

Ingredients:
Salt
1 pound pasta, I usually use spaghetti
1/3 pound bacon, chopped
1 medium onion, chopped
4 cloves garlic, minced
1/4 teaspoon crushed red pepper flakes
1/2 cup dry white wine
2 large egg yolks
3 tablespoons grated Parmigiano Reggiano, plus more, for topping
black pepper

Directions:
  • Place a large pot of water on the stove to boil. When water is boiling, add salt and pasta and cook to al dente.  When pasta is done don't forget to save 1/2 cup pasta water.
  • While pasta cooks, heat large skillet over medium heat. Saute bacon until brown and crispy, 3 to 5 minutes. 
  • Add onion and cook until softened, about 5 minutes.  
  • Add garlic and crushed pepper flake, saute 2 minutes. 
  • Add wine to the pan and reduce liquid by half, 2 minutes.
  • Beat together egg yolks, cheese, and while whisking vigorously, stir in a ladle of the boiling pasta water.
  • Drain pasta -- don't forget to reserve about 1/2 cup of pasta water (I usually forget this, hence my repeated reminders!).  Add pasta to pan with bacon mixture.  Toss pasta with bacon mixture, then add egg mixture and toss 1 minute, then remove from heat. Continue to toss, and adding reserved pasta water as necessary to loosen sauce, until sauce is coating the pasta. Add pepper to taste and salt, if necessary.  
  • Serve with extra cheese, for topping.

Monday, April 23, 2012

Cheesy Potato Soup with Mini Ham Sandwiches

This seems like a perfect recipe for a day like today.  The weather forecast calls for day of drenching rain and this is a soup and sandwich pairing that is warm and comforting.  It comes together quick enough for a weeknight and tastes great.  The soup is creamy and cheesy, while still being low fat -- you can't get much better than that!  Definitely use small red potatoes in this dish; they are waxier and won't turn to mush in the soup.  


The mini ham sandwiches that pair with it are cute (who doesn't like a mini sandwich?!?) and tasty.  The chive mayo is the element that really takes them to the next level.  It's a simple step that adds a ton of flavor and makes them not just a typical-thrown-together-with-stuff-in-the-fridge-kind-of sandwich.  I didn't really make any changes to the recipe and the only thing I might change in the future is throwing in a bit of smoked paprika, both in the soup and in the mayo for the sandwiches.  I think it would give a nice smoky hit to both elements and tie them together a bit more. 


Cheesy Potato Soup with Mini Ham Sandwiches
from Cooking Light, January 2012
serves 4


Ingredients:

1 tablespoon butter
1 cup chopped onion
2 1/2 tablespoons flour
3 cups chopped red potato (about 1 pound)
1 1/4 cups 1% milk
1 1/4 cup chicken broth
1/2 cup shredded 2% cheddar cheese
1/8 teaspoon ground red pepper
2 tablespoons chopped green onion
1 tablespoon minced chives
2 tablespoons mayonnaise
1 teaspoon Dijon mustard
8 slider rolls
4 ounces thinly sliced ham


Directions:
  • Melt butter in a medium pot over medium-high heat. Add onion and sauté 5 minutes or until onion is tender. Preheat oven to 400 degrees.
  • Sprinkle onion with flour; cook 1 minute, stirring constantly. 
  • Add potato, milk and broth to pan; bring to a boil. Cover, reduce heat, and simmer 10 minutes. 
  • While soup is simmering, start on the sandwiches.  Combine chives, mayo and dijon mustard.  Place the slider rolls, cut sides up, on a baking sheet and bake for 5 minutes, until toasty and golden brown.  
  • When the soup has finished simmering, add the shredded cheese and ground red pepper; cook 2 minutes or until cheese melts, stirring frequently. 
  • Once the rolls come out of the ove, spread cut sides with the mayo mixture.  Divide ham even among rolls.
  • Top each serving of soup with 1 1/2 teaspoons chopped green onions, serve.  

Wednesday, April 18, 2012

Spanish Shrimp with Sunset Orzo

Shrimp is showing up more and more in our weekly menu plan.  I've talked about my new-ness to seafood before, but shrimp has broken through and made themselves a staple in our house.  There's always a bag in the freezer and since they are quick to defrost, they make for great weeknight meals.  I will eat them, but I'm not comfortable enough with them yet to peel and devein them.  I don't like seeing their legs, that still makes me feel weird, so I leave that up to Zach.  ;-)


This meal was a great weeknight meal -- fast and flavorful.  It also made good leftovers for lunches the next day.  I left out the peas since I don't like them, but I did double up on the red pepper, using one large one instead of a small.  I think it would be great with some frozen diced carrots thrown in in place of the peas as well, or frozen corn too.  Both would work well with the 'color scheme' of the dish too, matching the 'sunset' theme.  I loved the use of chorizo in the dish, it gave a nice warm and spicy flavor to each bite.  


I made a few other changes as well, either with the aim of cutting fat/calories or in simplifying the steps/decreasing the dishes needed.  I love Rachael Ray's recipes but man does she use a lot of pots, pans and dishes!  I guess it's because she doesn't have to wash them up herself, and although neither do I (Zach is the main dishwasher in our house), I still cut out steps when I can.  I decreased the chorizo from 1/3 pound to 1/4 pound and also cut out the oil altogether.  I didn't find that that a fatty sausage like chorizo needs oil to brown, as soon as it gets warmed up and cooking it starts rendering fat into the pan, so why start with oil if you don't need to?  I also changed the steeping method for the saffron and chicken broth (why get another pot dirty when the microwave works just as well) and the cooking method for the shrimp (again, why get out another skillet, just throw them in with the veggies!).  I have a feeling this meal will be one more reason for shrimp to keep popping up on our weekly menus!


Spanish Shrimp with Spanish Orzo
serves 4
adapted from EveryDay with Rachael Ray, April 2009

Ingredients:
Salt
8 ounces orzo pasta
2 pinches saffron threads
1 cup chicken broth
1 tablespoon olive oil
1/4 pound Spanish chorizo, chopped
1 onion, chopped
1 large red bell pepper, chopped
2 cloves garlic, finely chopped
1 teaspoon ground turmeric
1 pound medium shrimp, peeled and deveined

1 teaspoon smoked paprika
1/4 cup parsley, chopped
Juice of 1/2 lemon


Directions:
  • Bring a large pot of water to a boil, salt it, add the orzo and cook until just al dente. Drain and cover.
  • While the water comes to a boil, steep the saffron in the chicken broth.  Pour the chicken broth into a glass measuring up and add the saffron.  Heat in the microwave for 1-2 minutes and let steep until needed.  
  • Heat a large non-stick skillet over medium heat. Add the chorizo and cook until browned, about 2 minutes. Add the onion, bell pepper, garlic and turmeric and cook for 5 minutes. 
  • Add the shrimp to the vegetable/chorizo mixture and cook until pink and firm, 2 to 3 minutes. 
  • Pour the saffron broth over the shrimp, chorizo and vegetables. Add the paprika and cooked orzo and toss for 2 minutes. 
  • Serve in bowls, topping with the parsley and lemon juice. 


Monday, April 16, 2012

Coconut Shrimp: Secret Recipe Club

It's time for another Secret Recipe Club post!  This month I was super excited when I started browsing through the blog I was assigned.  I got Savor the Senses, a blog written by Jenny who is a chef at a Morimoto restaurant in Hawaii!  How cool is that!  There were so many great recipes that piqued my interest.  Mahi Mahi in Green Chili Coconut Broth, Mojo Pork and Shrimp Baked Onions are all on my list of recipe ideas for upcoming menus.  And, with cinnamon being one of my favorite spices, Snickerdoodle Cupcakes will certainly show up in my future baking projects -- how cute are they?!?


After narrowing it down to 6 or so options, I left the final choice up to Zach.  He chose the Coconut Shrimp with Curry Dipping Sauce, and boy am I glad he did!  This was a fantastic, easy dinner that was also delicious.  I can't wait to make it again.  The coconut crisped up beautifully and gave a great crunchiness to the shrimp, without having to be fried.  The curry sauce was super, it is definitely spicy, depending on your curry powder and preferences, I would start with half the amount and taste as you go, adding more to meet your personal taste level.  Ours turned out spicy, but I thought it was just right -- a hit of spice complemented the sweetness of the coconut and shrimp and balanced out nicely.  We already want this dish back on the menu, and next time we will probably defrost the shrimp overnight, then peel in the morning and let them sit in the coconut milk all day.  The 30 minute marinating time was a tight fit for a weeknight meal for us, especially since the rest of the dish is fairly labor intensive -- triple coating of the breading layers, so we thought it would be nice to save some time and make it that much easier to get on the table before we are starving.  We served it alongside red pepper couscous and steamed broccoli to turn it into a main course dish instead of an appetizer.


Coconut Shrimp with Curry Dipping Sauce
from Savor the Senses
serves 6 as an appetizer, 4 as a main course


Ingredients:


1 lb shrimp (peeled & deveined)
1 can light coconut milk
1 cup flour, divided
3 eggs
1 cup panko breadcrumbs
1 cup flaked coconut, unsweetened
6 tablespoons light mayonnaise
2 tablespoons light sour cream
1 tablespoon curry powder
1/2 teaspoon cayenne pepper


Directions:


  • Add the peeled and deveined shrimp and the coconut milk in a bowl.  Stir to coat all shrimp with coconut milk and then refrigerate for 30 minutes.  
  • Drain the milk from the shrimp and pat the shrimp dry with paper towels.
  • Preheat the oven to 400 degrees.  
  • Set up three bowls for breading the shrimp -- one with 1/2 cup flour, one with the 3 eggs, beaten and the last bowl with the panko, remaining 1/2 cup flour and coconut mixed together.  Working one at a time, dip the shrimp in the plain flour, then egg wash and finally the coconut and breadcrumb mixture.  Once breaded, arrange the shrimp in a single layer on a sheet pan.  
  • Bake shrimp until crispy and the coconut flakes start to turn golden brown, 15-20 minutes.  
  • While the shrimp are baking combine the mayo, sour cream, curry powder and cayenne pepper to make the dipping sauce.  

Wednesday, February 8, 2012

Shrimp and Grits

I'm weird.  It took me a ridiculous amount of time to give seafood (other than canned tuna fish and fish sticks) a 'real' chance.  I think it was our Table 21 adventure at VOLT that really changed my mind.  At his restaurant Bryan Voltaggio serves up 21 courses of amazing food, each one about 3-4 bites.  I went into our dinner there in August of 2008 determined to try everything, and finish everything, even if I didn't love it.  It's only 3 bites, how bad can it be?  I had skate, sea bass, blue crab, foie gras, raw tuna and even lamb that night.  And, while I am still not a fan of lamb, I have changed my mind about seafood.  I now love scallops, most white fishes, tuna tartare and shrimp.  


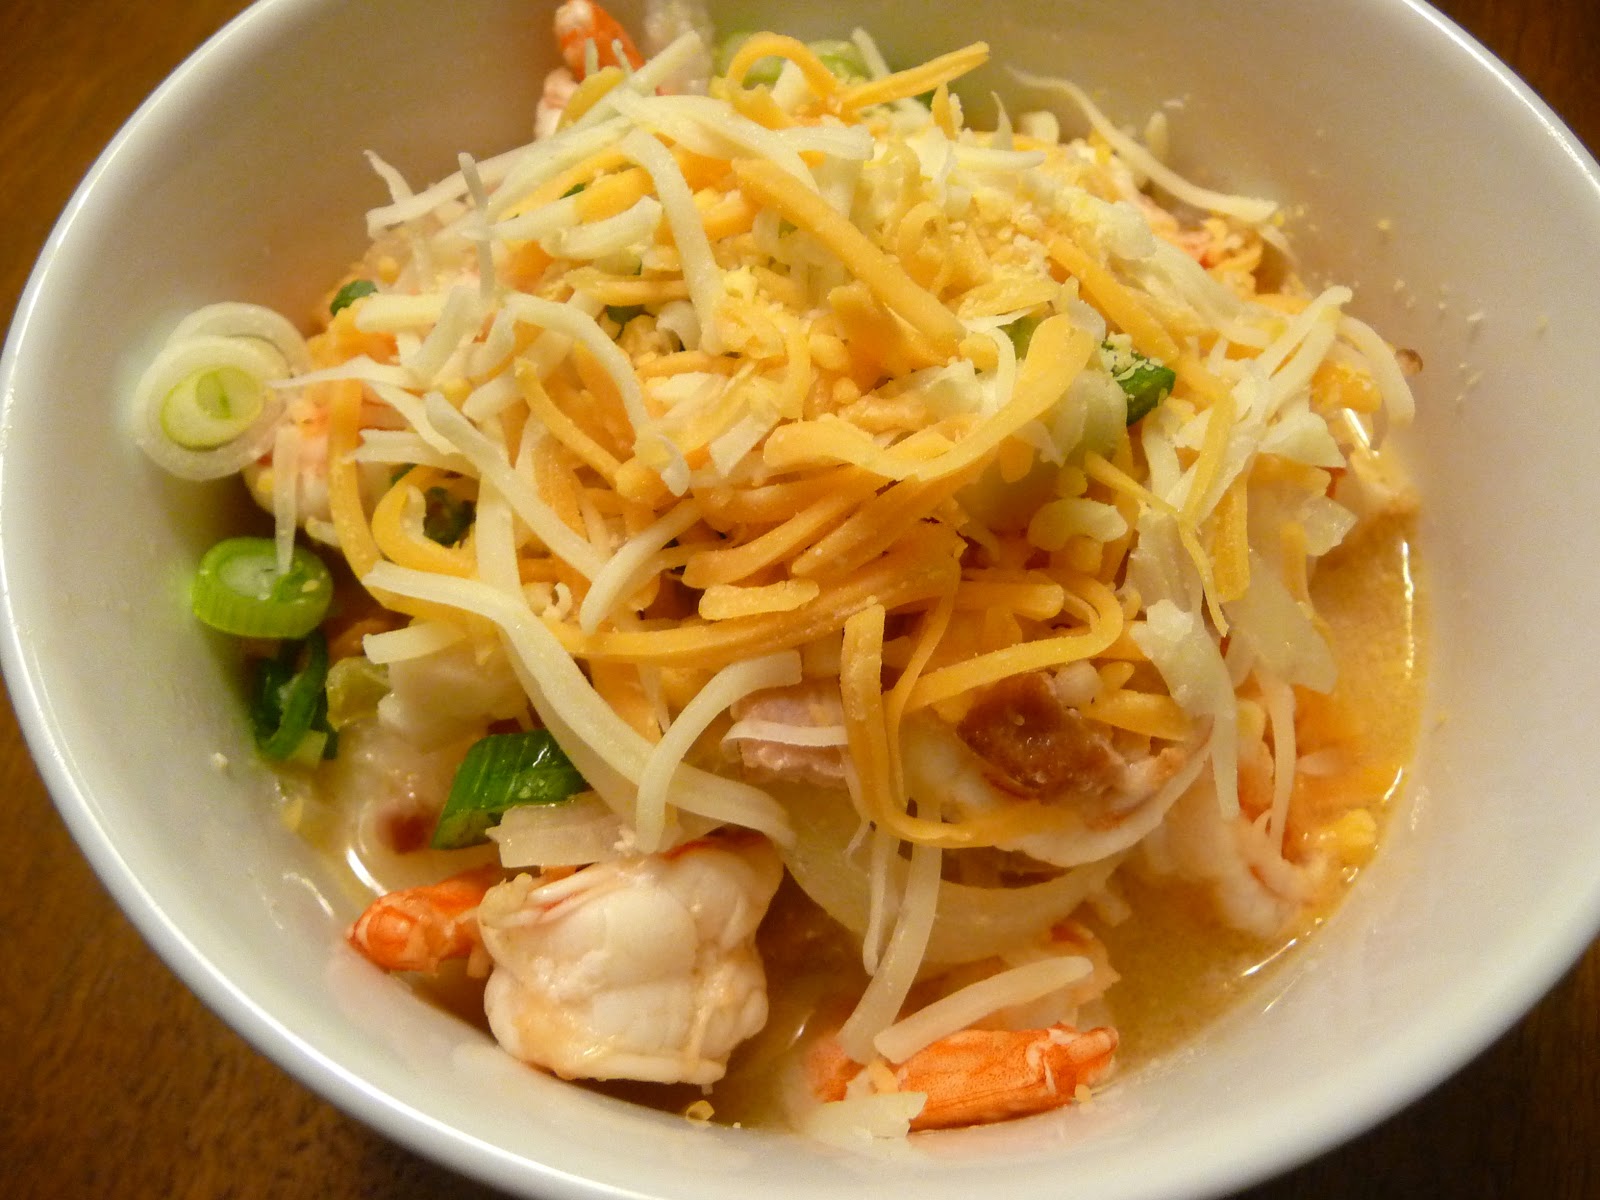
This is one of my favorite ways to enjoy shrimp lately -- I mean, what dish isn't improved by adding bacon and cheese to the sauce??  The flavors combine to make a great dish with just enough heat.  It's comforting and cheesey and bacony and delicious.  It's easy to make on a weeknight and is quite satisfying.  If you aren't completely sold on shrimp, or seafood, I do encourage you to give this dish a try -- maybe it will help change your mind.


Shrimp and Grits
slightly adapted from CookingLight.com
Serves 4


Ingredients:
3 tablespoons fresh lemon juice
1/2 teaspoon hot sauce
1 1/2 pounds peeled and deveined large shrimp
2 bacon slices, chopped
1 cup chopped onion
1 cup chopped green bell pepper
1 1/2 teaspoons minced garlic
2/3 cup chicken broth
1/2 cup chopped green onions, divided
5 cups water
1 1/2 cups quick-cooking grits
1 tablespoon butter
1 teaspoon salt
3/4 cup shredded sharp cheddar cheese


Directions:
  • Combine lemon juice, hot sauce and shrimp; set aside.
  • Cook bacon in a large nonstick skillet over medium heat until crisp. 
  • Add onion, bell pepper, and garlic to drippings in pan; cook 5 minutes or until tender, stirring occasionally. 
  • Stir in shrimp mixture, broth, and 1/4 cup green onions; cook 5 minutes or until shrimp are done, stirring frequently.
  • Bring water to a boil in a medium saucepan; gradually add grits, stirring constantly. Reduce heat to low; simmer, covered, for 5 minutes or until thick, stirring occasionally.
  • Stir in butter and salt. Serve shrimp mixture over grits; sprinkle with cheese and remaining green onions.

Wednesday, October 12, 2011

Southwestern Cornbread and Beef Skillet

I've always enjoyed cooking.  There is a comfort to taking a recipe, shopping for ingredients and then following the steps to create a dish.  I've also always been pretty comfortable putting my own twist on a recipe.  I like to change up the spices or switch out a few ingredients according to what I have on hand, or what better suits my tastes.  I'm not afraid to change things up and as I've gained more experience in the kitchen I've gotten more and more comfortable making changes, additions and substitutions to recipes and this dish is a great example of that. 

I was searching for a one-dish meal to make for Good Life Eats and My Baking Addiction's Holiday Recipe Exchange.  This week the contest is sponsored by Le Creuset.  I couldn't think of any one-dish meals off the top of my head besides soup so I did a quick search on the website for one of my favorite food magazines -- Everyday Food.  I found a slideshow of one pot meals and decided on this one.  After reading some reviews decided to make some changes. 


First of all I wanted to use things I had on hand, so I switched out the mushrooms for sweet corn.  The combo of corn, red peppers and onion then immediately brought to mind southwest flavors.  Some of the comments on the recipe suggested that the sauce was rather bland as it was written, so I thought a flavor profile with cumin, smoked paprika and cayenne would be a good move.  The other major change I made was to use buttermilk instead of sour cream and an egg to make the cornbread dough.  As I went to the fridge to get the egg I realized we were out of them.  Oops.  But, we happened to have buttermilk so I just substituted that instead.  The flavors were great and really worked well with the peppers and corn.  It was a quick and easy weeknight meal -- with only one pot to clean!!

Come join the fun with the My Baking Addiction and Good Life Eats holiday recipe exchange sponsored by Le Creuset!


Southwestern Cornbread and Beef Skillet
serves 4-6

Ingredients:
1/2 cup yellow cornmeal
1/2 cup plus 2 tablespoons all-purpose flour  
1 teaspoon baking soda
1/2 teaspoon smoked paprika
Coarse salt and ground pepper
1 tablespoon olive oil
2 red bell peppers (ribs and seeds removed), thinly sliced
1 medium red onion, chopped
1 1/2 cup corn (frozen or 15 oz can, drained)
1 teaspoon cumin
1 teaspoon smoked paprika
1/2 teaspoon cayenne pepper
1/2 teaspoon mexican oregano
1 pound ground sirloin
1/4 cup tomato paste
2/3 cup beef broth
3/4 cup buttermilk

Directions:
  • Preheat oven to 425 degrees.  In a small bowl mix cornmeal, 1/2 cup flour, baking soda, smoked paprika and 1/2 teaspoon salt.  Stir to combine. 
  • Heat a large skillet over medium-high heat.  Pour olive oil in the pan then add peppers and onion.  Saute until beginning to soften, about 5 minutes.  Then add corn and cook 2-3 minutes longer.  Add cumin, smoked paprika, cayenne, and oregano. 
  • Raise heat to high and add in ground beef and tomato paste.  Cook until beef is fully browned, about 5 minutes.  Sprinkle 2 tablespoons of flour over the pan and stir until flour is dissolved.  Add in the broth  and stir until a sauce forms.  Turn off heat and season with salt and pepper to taste.
  • Pour the buttermilk into the cornmeal/flour mixture and stir until just combined.  Drop tablespoons of batter on top of the beef mixture in the skillet.  There will be enough batter for  6 scoops, placing them about one inch apart.  Bake until biscuits are golden brown and a toothpick comes out clean, 18 to 20 minutes. 

Friday, October 7, 2011

Grilled Sausage Panzanella

This is a great recipe for the end of summer.  It's a fantastic way to get out and use your grill a few more times before the cold weather hits.  We had this one week in early summer and then have quickly repeated it almost every week since.  It's a great, fast weeknight meal and tastes fabulous.  Grilling the bread as well as the sausage really emphasizes smoky, charred flavors in the dish.  And it's so versatile.  We always have a few packages of sausage in the freezer, usually a flavored chicken sausage.  Trader Joe's has a great selection of varieties and our favorite grocery store in the world, Wegmans, has also recently launched a line in their own brand name as well.  We've done this with pesto sausage, sun-dried tomato sausages, Italian (both sweet and hot), smoked chardonnay and apple, andouille, spinach and feta, the list can go on and on.  I bet kielbasa would be particularly good as well -- which gives me another excuse to put this dish on the menu for the upcoming week (like I needed one!).


Grilled Sausage Panzanella
adapted (and infinitely customizable) from EveryDay with Rachael Ray, June/July 2010
Serves 4

Ingredients:
2 plum tomatoes, finely chopped (I've also used cherry/grape tomatoes that are halved and chopped heirloom tomatoes.)
1/4 large onion (or 1/2 medium), thinly sliced
1 clove garlic, finely chopped 
Salt and pepper 
Four thick slices bread (Use your preferred variety, I find Italian or sourdough work well.)
4 sausage links (about 1 pound), any variety 
2 tablespoons extra-virgin olive oil
2 tablespoons red wine vinegar 
15 fresh basil leaves, cut into ribbons
1/4 cup grated parmesan cheese 

Directions:
  • In a large bowl mix together the tomatoes, onion and garlic.  Season with salt and pepper to taste.  Let stand 15 minutes.  Preheat your grill to medium.
  • Once grill is hot and ready, grill bread slices, about 2 minutes in each side.  You want them to get toasty brown and have some charring around the edges.  
  • After removing the bread, grill the sausages.  If your sausages are precooked then you are just heating them up, so about 5-7 minutes total.  If you are using raw sausages you will need to grill until cooked completely, so about 10-12 minutes total.  Turn sausages often for even cooking/heating and nice grill marks.  
  • Add olive oil and red wine vinegar to the tomato mixture.  Cut bread into 1/2 -3/4 inch cubes.  Cut the sausages into similar sized slices.  Add the bread, sausage, basil and half the parmesan to the tomato mixture.  Toss until combined.  Divide into bowls and serve with the additional parmesan for sprinkling on top. 

Wednesday, September 28, 2011

Pork Fried Rice

I found this recipe a few months back in Cooking Light.  It was always in the back of my mind when menu planning, but never quite made it on the list.  I'm not quite sure what eventually moved it to the top of the list, but I wish I hadn't waited so long!  This was a great recipe, and is easy for a weeknight with a bit of planning ahead.  I made the rice the night before and kept it in the fridge until it was time to prep dinner.  If you can get that step done ahead of time, then this makes a quick meal.  I also love that it uses only half a pound of pork for 4 servings.  It's just enough to have small pieces sprinkled throughout but not enough to take over the dish.  It also helps stretch your budget since meat/protein is often the most costly part of the meal.  

This recipe does have a rather long list of ingredients, but most are found in many asian dishes.  Once you have mirin, seasme oil, and soy sauce they will last you ahwile and you will find many other dishes to use them in.  The other stuff is fairly inexpensive -- green onions, ginger, carrots, bean sprouts.  I made just one modification -- leaving out the celery since I don't like it.  But other than that its pretty straight-forward and pretty delicious!  Make sure to have everything prepped before you start cooking, once you begin cooking it moves pretty fast from start to finish.


Pork Fried Rice
barely adapted from Cooking Light, January 2011
serves 4

Ingredients:
2 tablespoons olive oil, divided
kosher salt
1/2 pound boneless pork loin chop, cut into 1/2-inch pieces
1/2 cup chopped carrot
1/2 cup chopped green onion bottoms
2 tablespoons minced garlic
2 tablespoons minced peeled fresh ginger
3 cups cooked, chilled long-grain brown rice
1 large egg
3 tablespoons mirin
3 tablespoons soy sauce
1 teaspoon sesame oil
1/4 teaspoon freshly ground black pepper
2 cups fresh bean sprouts
1/4 cup canned diced water chestnuts, rinsed and drained
1 cup chopped green onion tops

Directions:
  • Heat a large skillet over medium-high heat.  Add 1 tablespoon of oil to the skillet, swirling to coat.  Sprinkle the pork with a healthy pinch of kosher salt.  Add seasoned pork to pan and cook, stirring frequently until browned all over, about 4 minutes.  Remove pork from pan into a medium bowl.
  • Add carrot to pan, cook for 2 minutes.  Stir frequently and when lightly browned add them to the bowl with the pork.  
  • Add the remaining tablespoon oil to the pan and saute onion bottons, garlic and ginger until fragrant, about 30-45 seconds.  Add rice and stir, coating rice with oil.  Flatten into an even layer and let cook for 2-3 minutes, until starting to brown on the edges.  
  • Using a spoon, move the rice to the edges of the pan, leaving an empty spot in the center.  Pour the scrambled egg into the cleared spot and cook, stirring constantly.  
  • After cooking the egg to a soft scramble (about 30 seconds), return the pork and carrot mixture to the pan, mixing everything together.  Add in mirin and cook a minute or so, until it is absorbed.
  • Stir in 1/4 teaspoon kosher salt, soy sauce, sesame oil and pepper.  Remove from heat and stir in water chestnuts and bean sprouts.  Portion into bowls and top with green onion tops. 

Monday, September 26, 2011

Roasted Red Onion and Squash Pasta

This recipe is perfect for the approaching fall season.  Last week we got the first hard squashes in our CSA box and I know there will be more to come.  I didn't really have butternut squash until last year when we started getting them from our farm.  I was missing out.  In this recipe it's the star and it's delicious.  It turns into a creamy, delicious consistency and makes for a healthy meal.  I used whole wheat pasta, which played well with the nutty flavor of the squash.  This also is a good recipe for freezing.  It made a ton of pasta (I doubled the recipe) and we divided it up into individual portions and froze for quick lunches later on.  It reheated really well and tasted just as delicious!  The only change I made was to use parmesan cheese instead of fontina since we always have parmesan on hand.  We had everything for this meal on hand actually, which makes it a handy recipe to have in your back pocket for busy weeks. 


Roasted Red Onion and Squash Pasta
serves 4

Ingredients:
2 medium red onions, cut into 6 wedges each, layers separated
1 medium butternut squash, peeled and cut into 3/4-inch pieces
1 tablespoon coarsely chopped fresh sage leaves
1 tablespoon extra-virgin olive oil
Coarse salt and ground pepper
1/2 pound short ridged pasta, I used penne
1/4 cup grated parmesan cheese 
 
Directions:
  • Preheat oven to 450 degrees.  On a baking sheet toss onions, squash, sage and oil until all the vegetables are well coated.  Season with salt and pepper and arrange in a single layer.  Roast until tender and turning brown, about 20 minutes.  Stir vegetables halfway though.
  • While veggies roast, put a large pot of water on the stove and bring to a boil.  Once it is boiling, salt water and add pasta.  Cook according to package directions.  Save 1/2 cup of pasta water.  When pasta is cooked, drain and place in a large bowl.  When veggies are done, add them to the pasta and stir to combine.  Add the 1/2 cup of pasta water as needed to create a sauce that coats pasta.  Top with cheese and enjoy! 

Wednesday, September 14, 2011

Summer Squash, Chicken and Rice Casserole

I know, it's another zucchini recipe when the prime zucchini time has probably passed for most people.  They might be hanging out at many local farmer's markets though, so I wanted to get this up for those end of the season stragglers.  It calls for one yellow summer squash and one zucchini, but you could use two of either one, depending on your local supply.  This recipe makes a great side dish, or can be a main dish with a nice side salad.  It's a quick and easy way (even quicker if you use a to use up a decent amount of squash at once, and would make a great potluck dish or something to take to a sick/recovering friend or family member.  It's cheesy and creamy and comforting.  Yum.


Summer Squash, Chicken and Rice Casserole

Ingredients:
1 tablespoon olive oil
1 boneless, skinless chicken breast (about 8 ounces)
1 medium onion, chopped
1 cup chicken broth (about 1 can)
1 tablespoon butter
1 medium zucchini (about 8 ounces), halved lengthwise then thinly sliced
1 medium yellow summer squash (about 8 ounces), halved lengthwise, then thinly sliced
2 cups cooked long-grain rice (I used brown)
1 teaspoon minced fresh rosemary
1 1/2 tablespoons flour
1 1/2 cups low-fat milk
1/2 cup grated parmesan cheese
Kosher salt and black pepper

Directions:
  • Preheat oven to 350 degrees.  Coat an 8x8 baking dish with cooking spray.
  • Heat a large skillet over medium-high heat.  Add the oil to the pan, swirling to coat.  
  • Season chicken with salt and pepper on both sides.  Place chicken in the pan.  Cook, turning once, about 6 minutes per side.  Remove chicken from pan and let rest for 10 minutes.
  • Add chopped onion to skillet, using a touch more oil if necessary and reducing the heat to medium.  Cook until softened and turning golden, 5-7 minutes. 
  • Add broth to pan and increase heat to medium-heat, bringing broth to a simmer.  Simmer until reduced by half.  
  • While the broth is simmering, shred the chicken and place in a large bowl.  When the broth is reduced add the broth and onions to the bowl with the chicken. 
  • Return pan to heat and melt butter.  Add zucchini and yellow squash to pan, sauteing until softened and just starting to brown, about 4 minutes.  Add squash to bowl with chicken.  Also add rice and rosemary to the bowl.  Stir to combine.
  • In a medium saucepan over medium heat stir flour.  As you stir the flour, slowly pour in milk, making sure to stir or whisk until smooth.  Bring to a boil.  Cook one minute, until thickened.  
  • Remove from heat and add in 1/4 cup of the cheese.  Stir until smooth and add in 1/4 teaspoon ground pepper.  Add milk mixture to the large bowl of the chicken mixture.  
  • Transfer chicken mixture to the prepared 8x8 baking dish.  Sprinkle the remaining cheese on top and place in the oven.  Bake at 350 degrees for 20 minutes.  
  • Remove from oven and turn on broiler.  Broil casserole until golden, about 5 minutes. 

Wednesday, July 20, 2011

Cilantro Shrimp Scampi

So.... I wrote this back in May but never got around to uploading the picture and posting it.  I am a bad blogger.  But, now that I am on summer vacation and finally home after three weeks of travelling I hope to get back to a regular posting schedule.  Most importantly, I hope to knock out the vast majority of over 40 draft posts I have sitting half-composed, and make major progress on my 30 in 30 list.  I wrote it up back in November, and actually have made quite a few things, but just haven't gotten them posted yet.  I've got just under 4 months to go and at least 30 posts to get up in that time, so watch out for lots of new recipes!!


This is the second recipe I'm posting from my Cookbook of the Month, the Foster Harris House Cookbook.  When I decided to make this the pick for the month, I did what I usually do for my monthly pick, stick post-it notes on the recipes I'd most like to make/highlight in the month's posts.  Then I hand it over to Zach and ask him to pick what he would like.  My choices are like the first round and his are the second round, since he will usually pick one or two of the 10-12 I've chosen.  As soon as I saw this recipe in the book I knew it would make it past Zach's second round.  He loves anything with cilantro, so you don't have to look much further than the name of the recipe to know he's going to pick it. 

This was super easy and quick to put together on a weeknight.  The notes on the recipe in the book say that while most people serve scampi with pasta, they prefer it with basmati rice to soak up the sauce.  We served it with a parmesan orzo and it paired really well together.


Cilantro Shrimp Scampi
Serves 4

Ingredients:
1/4 cup olive oil
1 pound large peeled, deveined shrimp
4 tablespoons minced garlic
pinch of cayenne pepper
1/2 cup dry white wine
2 tablespoons lime juice
salt and pepper to taste
2 tablespoons chopped, fresh cilantro
6 tablespoons butter

Directions:
  • Heat oil in a large skillet over medium heat.  Saute shrimp, turning over once, until just cooked through, about 3 minutes.  Transfer to a plate with tongs, leaving the oil in the skillet.
  • Add garlic, cayenne, wine, lime juice, salt and pepper to the remaining oil.  Cook over high heat, stirring occasionally until reduced slightly, about 1 minute. 
  • Add butter to skillet, stir until melted, then add shrimp.  
  • Serve on top of pasta or rice, whichever you desire.

Wednesday, May 18, 2011

Asparagus Risotto

This recipe is the first from my Cookbook of the Month, the Foster Harris House Cookbook.  I chose it because we always have arborio rice on hand and all the other ingredients except the asparagus.  Asparagus was on sale for 1.99 a pound at a local grocery store so I picked some up with no specific plan.  I flipped through this book and decided it would be a perfect match.  This was a fairly straight-forward risotto recipe, except for the first few steps  You cook the asparagus in chicken stock that you then keep simmering on the stove to use as the cooking liquid for the rice.  This maximizes the asparagus-ness of the risotto and makes for one less pot to clean!  It was delicious and had a great spring flavor.  I hope to make it again soon as we start to get our weekly CSA boxes and can use some of the farm-fresh asparagus we will get early in the season.


Asparagus Risotto 

Ingredients:
1 quart (4 cups) chicken stock
1 pound asparagus
4 tablespoons butter, divided in half
4 tablespoons oil, divided in half
1 medium onion, chopped
2 cups Arborio rice
1/2 cup dry white wine
1/2 cup grated parmesan cheese, plus more for garnish
salt and pepper

Directions:
  • Trim ends off asparagus.  Cut on the bias into 1/4 inch pieces, saving the top 2-3 inches as whole spears.  
  • Heat the chicken stock to a simmer.  Cook asparagus in chicken stock for 5 minutes, or until al dente.  Remove from stock and keep in a cool water bath.  Return stock to a simmer.
  • In a large pot, heat 2 tablespoons butter and 2 tablespoons olive oil over medium heat.  Add onion and cook until softened, about 10 minutes.  Add rice and stir, cooking for 2-3 minutes.  Add wine and cook until liquid is absorbed.  
  • Add about half a cup of stock at a time to the rice and onion mixture.  Stir frequently until liquid is absorbed.  Continue adding the stock, half a cup at time, stirring in between and adding more stock once the last addition is absorbed.  The rice will get thick and creamy.  Taste the rice towards the end of the process, you are looking for it to be al dente, with just a bit of bite in the middle.  
  • Add the chopped asparagus, 1/2 cup of cheese and the remaining butter and olive oil.  Stir to combine, then season to taste with salt and pepper.
  • Serve risotto, topping with spears and extra parmesan.

Friday, April 29, 2011

Baked Chicken Parmesan

This recipe definitely caught my eye the first time I flipped through ATK's Healthy Family Cookbook.  Chicken parmesan is delicious, but not great for you when it's fried.  A version that is baked and is easy for a weeknight meal -- awesome!  This is simple and fabulous.  I think it has a great balance of ingredients and the strips of basil on top really brings out a fresh flavor.  I went light on the sauce on mine, I don't like chicken parmesan smothered in tomato sauce -- the whole point is the crispy crunch of the chicken, right?


Baked Chicken Parmesan
serves 6

Ingredients:

1 1/2 cups panko bread crumbs
1 tablespoon olive oil
1/2 cup grated parmesan
1/2 cup flour
1 1/2 teaspoons garlic powder
3 large egg whites
1 tablespoon water
vegetable oil spray
6 boneless, skinless chicken cutlets, pounded 1/4 inch thick
salt and pepper
2 cups tomato sauce, warmed
3/4 cup shredded mozzarella
1 tablespoon chopped fresh basil


Directions:

  • Preheat oven to 475 degrees.  
  • Combine the bread crumbs and olive oil in a non-stick skillet and toast over medium heat until golden.
  • Set up a breading station.  Let the toasted bread crumbs cool in a shallow dish, then mix in the parmesan.  Whisk the egg whites and water in a second bowl.  In a third bowl combine the flour and garlic powder.  
  • Place a wire rack over a baking sheet and spray with the cooking spray.  
  • Pat the chicken dry, season with salt and pepper.  Take one piece of chicken at a time through the breading stations -- first in the flour, patting off any extra flour.  Then coat in the egg whites, letting the excess drip off.  The last step us to coat with the toasted bread crumbs, making sure to pat them on to stick to the chicken evenly.
  • Place the coated cutlets on the wire rack, then spray with the cooking spray.  
  • Bake about 8-10 minutes or until any juices are clear.  You can also use a meat thermometer to check that the chicken reaches 160 degrees.
  • Top with desired amount of sauce and 2 tablespoons of the shredded mozzarella.  Bake until the cheese has melted, 3 to 5 minutes more.  
  • Sprinkle with basil and serve.  

Sunday, November 14, 2010

Oven Fried Chicken: Barefoot Bloggers

 Yum, yum, yum!  I loved this dish.  It was deliciously crispy on the outside and the meat was moist and flavorful.  The skin was perfect.  I love crispy chicken or turkey skin (who doesn't?  well, besides vegetarians...).  The crust was well flavored; I especially enjoyed the noticeably peppery aspect.  It was good that day and also good warmed up.  We also shredded some of the meat to be used in other dishes.  We would definitely make this again. 


chosen by Vicki of My Fare Lady 

Wednesday, July 14, 2010

Velveted Chicken Stir-Fry

When we got snow peas in our CSA box our first thought was a stir-fry.  I went right to my collection of Cooks Illustrated magazines to study up on the best techniques.  I love Cooks Illustrated for this reason - they painstakingly research every aspect of a recipe so I know it's going to be the best.  If it's not good, chances are I screwed up somehow and it's not the recipe's fault.  So, after reading through a few issues and learning a few pointers and techniques we were ready to make our own stir-fry.  They say a non-stick skillet is actually the best for stir-frys, not a wok.  They also introduced me to the traditional Chinese technique of velveting chicken -- coating chicken pieces in a cornstartch and egg white or oil mixture then parcooking in moderately heated oil.  It really gave the chicken a more authentic texture and flavor.  It was moist, juicy and delicious, not dry or overcooked like stir-frys I have made in the past.  I worked off the recipe for the velveted chicken, but we used the veggies we wanted.  The snow peas were the original basis for the dish.  We saw some great eggplant at the farmer's market we thought would match well.  When we were at the market we also picked up some baby bok choy, garlic scapes and scallions.  Next time I might do either scapes or scallions, but otherwise I think it turned out pretty well. 


Gingery Stir-Fried Chicken with Vegtables
from Cooks Illustrated, May/June 2004

Ingredients:

for Marinated Velveted Chicken:
1/4 cup soy sauce
1/4 cup dry sherry
1 cup water
1 pound boneless, skinless chicken breasts, thinly sliced
2 tablespoons sesame oil
1 tablespoon cornstarch
1 tablespoon flour

for stir-fry:
1/4 cup chicken broth
2 tablespoons dry sherry
1 tablespoon soy sauce
1 tablespoon hoisin sauce
1/2 teaspoon sesame oil
1 teaspoon cornstarch
1 teaspoon sugar
1/4 teaspoon red pepper flakes
4 teaspoons minced fresh ginger (about a 1 1/2 inch piece)
1 medium garlic clove, minced
peanut or vegetable oil
1 recipe of Marinated Velveted Chicken
2 heads of baby bok choy, cut on bias in 1/2 inch strips
1 small eggplant, cut into 1 inch cubes
3 scallions, cut into 1 inch pieces
1 bunch of garlic scapes (8-10), cut into 1 inch pieces

Directions:

For Marninated Velveted Chicken:
  • Combine soy sauce, sherry and water in medium bowl.  Add chicken and stir to coat.  Cover with plastic wrap and refrigerate for at least 20 minutes and up to 1 hour.
  • Immediately before using mix sesame oil, cornstarch and flour in medium bowl until smooth.  toss chicken in cornstarch/flour mixture until evenly coated.  
For Stir-Fry:
  • Whick broth, sherry, hoisin sauce, sesame oil, cornstarch, sugar, pepper flakes and 2 teaspoons ginger in small bowl; set aside.  Combine remaining 2 teaspoons ginger, garlic, and 1 teaspoon peanut oil in small bowl; set aside.
  • Heat 2 teapoons peanut oil in 12-inch non-stick skillet over high heat until smoking.  Add half of chicken to skillet, making sure to not overcrowd the pan.  Cook without stirring but separating pieces if needed until gold brown on first side, about 1 minute.  Turn chicken pieces and cook until lightly browned on second side, abotu 30 seconds.  Transfer chicken to clean plate, repeat with more oil and the rest of chicken.
  • Add 1 tablespoon peanut oil to empty skillet, heat until just smoking.  Add bok choy; stir-fry until crisp tender, remove to clean bowl.  
  • Add 1 tablespoon peanut oil to empty skillet, heat until just smoking.  Ad eggplant; stir-fry until browned on all sides, 2-3 mintues.  Remove to bowl with bok choy.
  • Add 1 tablespoon peanut oil to empty skiller, hear until just smoking.  Add scapes and scallions; stir-fry until crips-tender.  Push to sides of skillet.  
  • Add garlic/ginger mixture to center of skillet and cook, mashing with a spoon until fragrant, about 30 seconds.  Stir mixture into scallion/scape mixture and cook about 30 seconds longer.
  • Stir in bok choy pieces and eggplant, then add chicken back to skillet as well.  Whisk sauce to recombine and then add sauce to skillet.  Reduce heat to medium and cook stiring constantly until sauce is thickened and chicken is cooked through.  Serve immediately.